
 CONTACT US
Side Channel for Light Blocking
You can order channels that block light around the shade sides. These channels will not block light at the top of the shade (if open) or block light from shades that are not opaque. Since channels are installed separately from the shade, most users try the shades first to see if they really need channels or not (and can avoid extra time and expense). Most users decide they do not need channels as enough light is blocked. Some do still want them, and you can easily order them from Leviosa Shades.
Pricing (order here) is per linear foot (rounded up), and we can cut to your exact measurements. Many customers purchase pieces rounded up to the nearest foot, and then custom cut the channels for a precise fit during installation since the aluminum channels cut easily with a chop saw (aluminum cutting blade) or hacksaw. Shipping is extra, and depends on location.
Maximum channel lengths are 16 ft. Expect freight shipping fees for single long pieces (>89 inches) of $200 - $500 depending on location. You can choose to split long channels to avoid freight shipping charges. While the seam between adjacent pieces is not invisible, it is slight, and most customers find them acceptable.
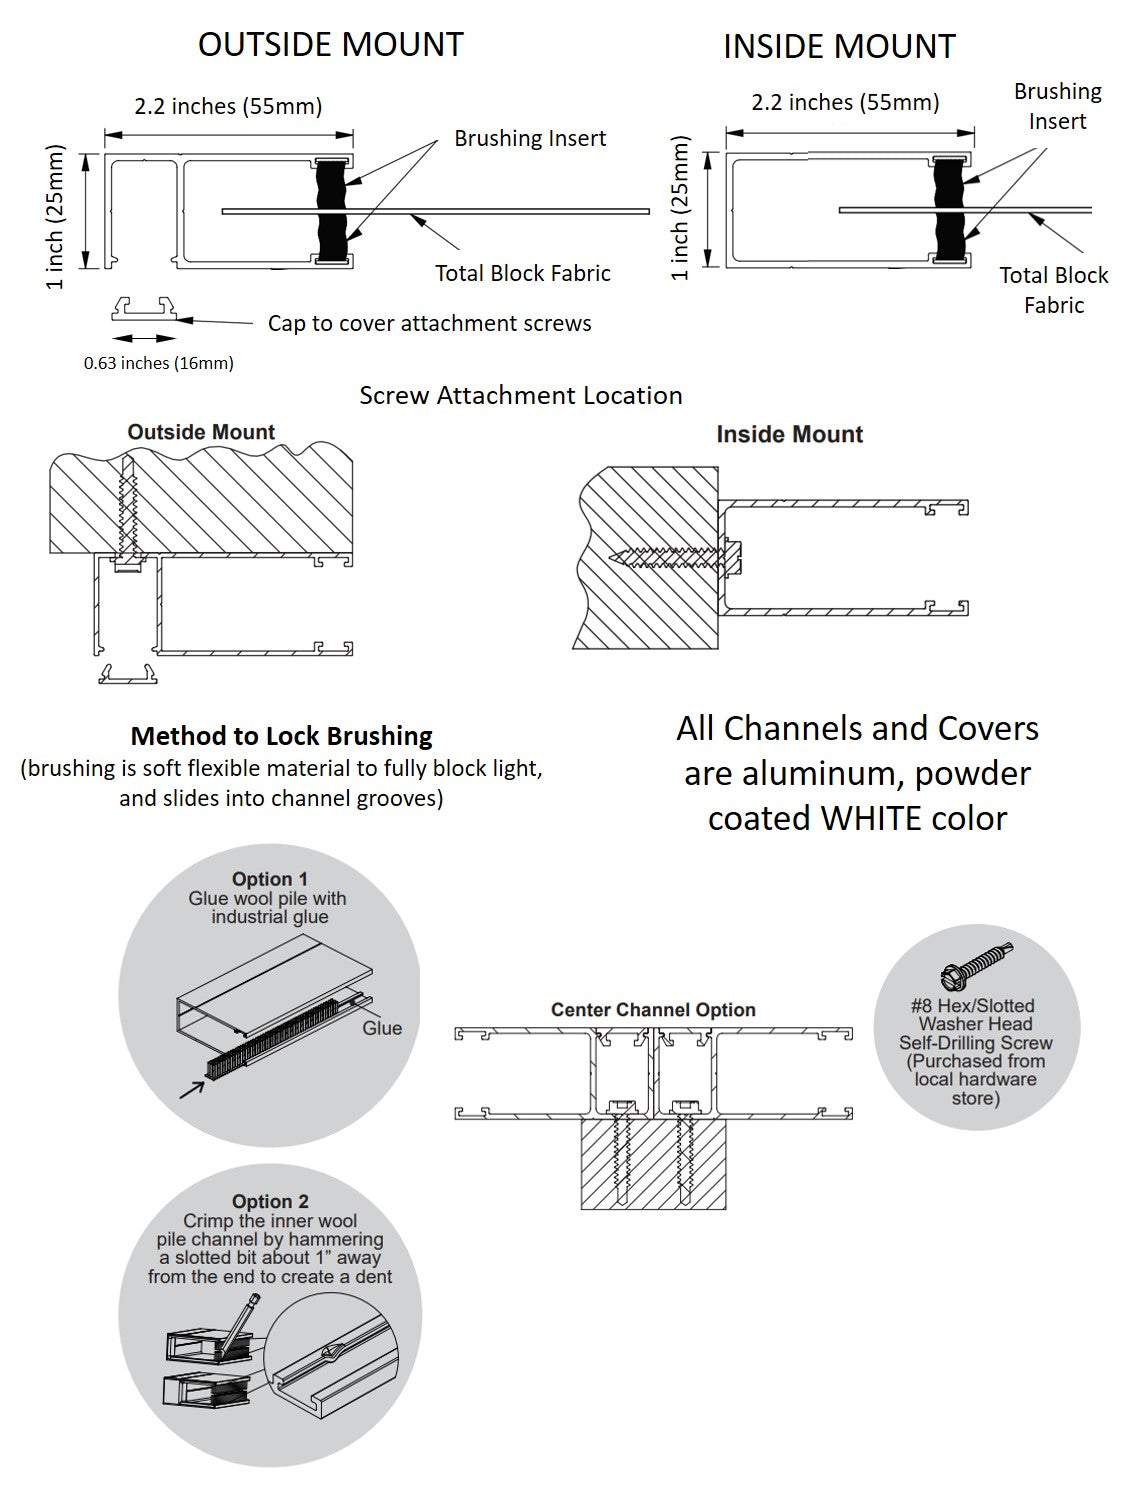
Channels come in white powder coated aluminum. Other colors are special order - please contact us. As an option, you can paint them to match your trim.
Side channels come with light gray brushing. The brushing is a thin fibrous material that inserts into the tips of the channels to more fully block all light, and helps the shade travel smoothly though the channel. Different side channel options are available based on whether you INSIDE or OUTSIDE mount your shades.
Please contact us to add side channels to your order.

Installation Instructions for Side Channels
- Install the shades first and ensure the shade travels up and down as designed.
- The channels should be lined up so the shade fabric, when rolled up, travels near the back side of the channel without the channel interfering with shade travel. Program the shade position so the fabric is already inside the channel by at least 1/4 inch. While the fabric unrolls, that travel path will move slightly toward the room. After the top position is planned, use a leveling device to ensure the full channel is mounted true vertical. Note the position with small pencil marks on wall/jamb in back of the channel. The channels should be mounted with the channel bushing already attached to the small grooves on the channel edges.
- Acquire #8 self-tapping mounting screws that are long enough to penetrate into a solid surface (wood, metal, thick plastic). Plan holes for INside mount type channels through the center of the U-shape, while OUTside mount type channels have an area for holes that is concealed by a slide cover (remove that cover before mounting channels). Attach screws every 2 feet of channel length, starting ~6 inches from each end. If mounting into drywall or less solid surfaces, pre-drill holes and use anchors and associated screws sufficient to support at least 5 lbs shear force.
- For OUTside mount type channels, replace the slide cover.
- Operate the shade to ensure it smoothly travels through the channels. if shade travel is impeded (example: shade bunches up), return the shade to the rolled position and adjust the channel.
Special instructions for REVERSE roll shades:
For INside mount side channels, reverse roll shades (fabric rolls toward the room instead of toward the window) require ~2.5" of space (depending on mounting brackets) from the back of the shade brackets. Ensure you have this space for proper installation. Otherwise, consider OUTside mount side channels directly on the wall, which require precise alignment of the shade mounting brackets for the shade to travel without impedance, or shimming may be required.